Sunday, 10 April 2016

#Salesforce Certified Platform Developer II : Sharing Experience

Hi All,
After long time of 5 months I went for another certification and this one is a new one, didn't get allot of information about the experience of the this new salesforce certification, now I have 8 salesforce certs, I must say this one is made me nervous, but felt great when I cleared this one.


Here are few important things that should be looked into before appearing in the exam

Compound Field Considerations and Limitations

Address and geolocation compound fields are convenient and result in more concise, clear code. Here are some things to consider when using them in your apps.
Both address and geolocation compound fields have the following limitations.
  • Compound fields are read-only. To update field values, modify the individual field components.
  • Compound fields are accessible only through the SOAP and REST APIs. The compound versions of fields aren’t accessible anywhere in the Salesforce user interface.
  • Although compound fields can be queried with the Location and Address Apex classes, they’re editable only as components of the actual field. Read and set geolocation field components by appending “__latitude__s” or “__longitude__s” to the field name, instead of the usual “__c.”
Use convertCurrency() in a SOQL query to convert currency fields to the user’s currency. This action requires that the organization is multicurrency-enabled.
Use this syntax for the RETURNING clause:
convertCurrency(Amount)
For example,
FIND {test} RETURNING Opportunity(Name, convertCurrency(Amount))

If an org has enabled advanced currency management, dated exchange rates are used when converting currency fields on opportunities, opportunity line items, and opportunity history. With advanced currency management, convertCurrencyuses the conversion rate that corresponds to a given field (for example, CloseDate on opportunities). When advanced currency management isn’t enabled, the most recent conversion date entered is used.

Continuation :Make Long-Running Callouts from a Visualforce Page

Use asynchronous callouts to make long-running requests from a Visualforce page to an external Web service and process responses in callback methods. Asynchronous callouts that are made from a Visualforce page don’t count toward theApex limit of 10 synchronous requests that last longer than five seconds. As a result, you can make more long-running callouts and you can integrate your Visualforce pages with complex back-end assets.

An asynchronous callout is a callout that is made from a Visualforce page for which the response is returned through a callback method. An asynchronous callout is also referred to as a continuation.


Transaction Control

All requests are delimited by the trigger, class method, Web Service, Visualforce page or anonymous block that executes the Apex code. If the entire request completes successfully, all changes are committed to the database. For example, suppose a Visualforce page called an Apex controller, which in turn called an additional Apex class. Only when all theApex code has finished running and the Visualforce page has finished running, are the changes committed to the database. If the request does not complete successfully, all database changes are rolled back.
Sometimes during the processing of records, your business rules require that partial work (already executed DML statements) be “rolled back” so that the processing can continue in another direction. Apex gives you the ability to generate a savepoint, that is, a point in the request that specifies the state of the database at that time. Any DML statement that occurs after the savepoint can be discarded, and the database can be restored to the same condition it was in at the time you generated the savepoint.

DML Statements vs. Database Class Methods

Apex offers two ways to perform DML operations: using DML statements or Database class methods. This provides flexibility in how you perform data operations. DML statements are more straightforward to use and result in exceptions that you can handle in your code. 


Set Up Test Data for a Test Class

Test setup methods are defined in a test class, take no arguments, and return no value. The following is the syntax of a test setup method.
@testSetup static void methodName() {
}
Use test setup methods (methods that are annotated with @testSetup) to create test records once and then access them in any test method in the test class. Test setup methods are useful and can be time-saving when you need to create a common set of records that all test methods operate on or prerequisite data.

Best Practices for Improving Visualforce Performance

Defining Transient with variable and minimizing the view state, using lazy loading and  the minification of JavaScript and CSS,

InvocableMethod Annotation

Use the InvocableMethod annotation to identify methods that can be run as invocable actions.
Invocable methods are called with the REST API and used to invoke a single Apex method. Invocable methods have dynamic input and output values and support describe calls.
The following code sample shows an invocable method with primitive data types.

 public class AccountQueryAction {  
  @InvocableMethod(label='Get Account Names' description='Returns the list of account names corresponding to the specified account IDs.')  
  public static List<String> getAccountNames(List<ID> ids) {  
   List<String> accountNames = new List<String>();  
   List<Account> accounts = [SELECT Name FROM Account WHERE Id in :ids];  
   for (Account account : accounts) {  
    accountNames.add(account.Name);  
   }  
   return accountNames;  
  }  
 }  


Pagination Strategies 

When to use standardsetcontroller, or when to offset and SOQL, best that you can have about this topic is this post

Few more topics

1. Lightning components
2. Using Developer console.
3. Test class best practice
4. SOQL and SOSL
5. Apex charts
6. Rollup summary
7. Http callout and its testing

If you cover all these topics, then for sure you can clear this exam.
thanks


Saturday, 19 March 2016

Salesforce Authenticator : A Great New Feature to Set up two-factor authentication

Writing a new blog post after a long time, thanks to this new feature that I couldn't stop me for posting this new blog.
Here I am going talk about salesforce authenticator, that is one of the best feature of the salesforce security.


Salesforce have introduced a way to authenticate login in Salesforce org, Salesforce have introduced an app to do the authentication using mobile app, using your system previously it was doing with a security code, that will be sent to your email, but now salesforce has raised the bar.

To use this authentication, you don't have to do any kind of coding.

STEP 1 : Go to the permission sets and create a permission, make sure that permission set has "Two-Factor Authentication for User Interface Logins" as showed in snapshots.


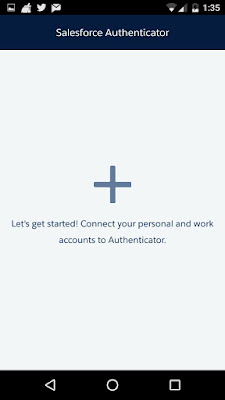
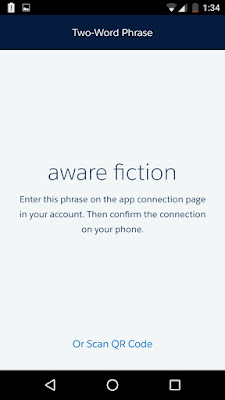
STEP 2 : Now install the Salesforce Authenticator app from app store available for IOS and android as well. You will get a tour of the app, screens will look something like below, after when you are done with the tour you will get a + symbol click on that, you will get a two word phrase, that you have to enter when you are trying to login with the user to whom you have assigned the permission set.


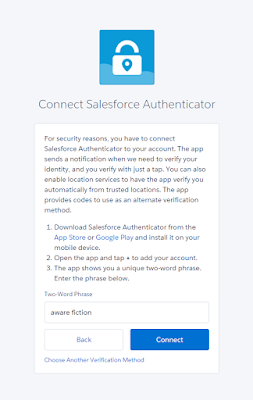
STEP 3 : Now enter the enter the username and password of the user to whom you have assigned the permission set, just after that you will get this below screen where you have enter the two word phrase.


You are done now, now you have connected the authenticator app with your salesforce account, easy right ?

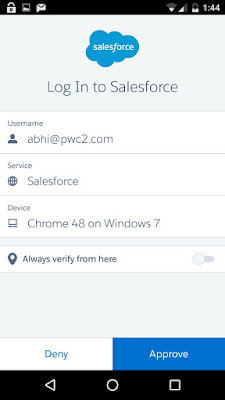
So whenever user tries to login he/she will get this screen until you verify the account in you Authenticator app.


DISCONNECT THE AUTHENTICATOR APP

You just have to go to the user on which you have enable authentication and click on disconnect in fron of these below two field.


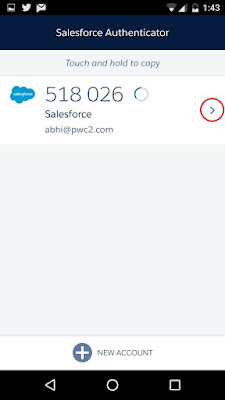
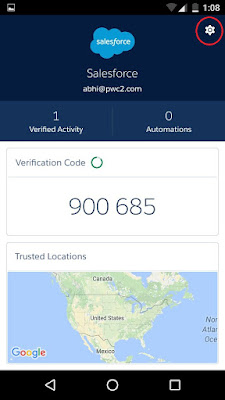
To remove account from the app, you can tap on right direction symbol, and then tap on right corner


Note : You can also remove the account from the authenticator app, but then user will not be able to login as there is not app which is connected to that account, but the account is connected to the app.

If you want to learn while playing it there is module as well on trailhead to experience it click here 
We are done, hope this new feature helps to secure your salesforce account.


thank you

Thursday, 17 December 2015

Bootstrap Modal Using AngularJS and Javascript in #Salesforce

This blog is about using bootstrap modal using AngularJS and Javascript, there are two different ways of using the modal and fetching the values from the modal.

I have added few fields in the modal and accessing the fields from the modal using two different buttons, below are the buttons

Modals code is same but only the function of fetching the values is different.
Here is how the modal looks


Here is the code of the page with the modal code and accessing the values of the modal in different ways.
Check out the code and if any issue or queries just comment I would be happy to help.

1:  <apex:page sidebar="false" showHeader="false" docType="html-5.0" standardStylesheets="false" applyBodyTag="false" applyHtmlTag="false">  
2:    <html lang="en">  
3:      <title>Manage Users</title>  
4:      <head>  
5:        <meta charset="utf-8"></meta>  
6:        <meta name="viewport" content="width=device-width, initial-scale=1"></meta>  
7:        <link rel="stylesheet" href="https://maxcdn.bootstrapcdn.com/bootstrap/3.3.5/css/bootstrap.min.css"></link>  
8:        <script src="https://ajax.googleapis.com/ajax/libs/jquery/1.11.3/jquery.min.js"></script>  
9:        <script src="https://maxcdn.bootstrapcdn.com/bootstrap/3.3.5/js/bootstrap.min.js"></script>  
10:        <script>  
11:          $(document).on("click","#myReset",function() {  
12:            $('#myModal').modal('hide');  
13:          });  
14:          //click to save data filled in the modal using javascript  
15:          $(document).on("click", "#btnCreateContact", function(event){  
16:            var fn = document.getElementById("firstname").value;  
17:            var ln = document.getElementById("lastname").value;  
18:            var ph = document.getElementById("phone").value;  
19:            var em = document.getElementById("email").value;  
20:            var title = document.getElementById("title").value;  
21:            if(em == '' || ln == '' || fn == '' || title == '') {  
22:              alert('First Name, Last Name, Email and Title are required.');  
23:            } else {  
24:              //calling remote action  
25:              YOUR_APEX_CLASS.REMOTE_ACTION_METHOD(fn, ln, em, title, ph, function(response,event) {   
26:                $('#myModal').modal('hide');    
27:                if (event.status) {  
28:                  //debugger;   
29:                  if (response == null || response == '') {  
30:                    //Reload window and close modal  
31:                    //window.location.assign(window.location.href);  
32:                    window.location.reload(true);  
33:                    $('#myModal').modal('hide');  
34:                  } else {  
35:                    $('#myModal').modal('hide');  
36:                    alert(response);  
37:                    window.location.reload(true);  
38:                  }  
39:                } else {  
40:                  $('#myModal').modal('hide');  
41:                  alert(event.message);  
42:                  window.location.reload(true);  
43:                }  
44:              },{escape:false, buffer: false});  
45:            }  
46:          });  
47:          // USING ANGULAR NOW  
48:          //Initialling controller  
49:          myapp.controller('MainController',['$q','$log','$scope',function($q,$log,$scope){  
50:            $scope.firstname = '';  
51:            $scope.lastname = '';  
52:            $scope.phone = '';  
53:            $scope.email = '';  
54:            $scope.title = '';  
55:            //CALL REMOTE ACTION METHOD   
56:            MY_CLASS_NAME.REMOTE_ACTION(firstname, lastname, phone, email, title, function(response,event) {   
57:              // DO YOUR STUFF HERE  
58:            });  
59:          }]);  
60:         </script>  
61:      </head>  
62:       <!-- Modal -->  
63:       <div class="modal fade" id="myModal">  
64:        <div class="modal-dialog">  
65:         <!-- Modal content-->  
66:         <div class="modal-content">  
67:          <div class="modal-header">  
68:           <button type="button" class="close" data-dismiss="modal">&times;</button>  
69:           <h4 class="modal-title">Contact Details</h4>  
70:          </div>  
71:            <div class="col-xs-12 form-group">  
72:            </div>  
73:            <div class="col-xs-12 form-group">  
74:              <label>First Name<font color="red">*</font></label>  
75:              <input class="form-control" id="firstname" value="" ng-model="firstname"/>  
76:            </div>  
77:            <div class="col-xs-12 form-group">  
78:              <label>Last Name<font color="red">*</font></label>  
79:              <input class="form-control" id="lastname" value="" ng-model="lastname"/>  
80:            </div>  
81:            <div class="col-xs-12 form-group">  
82:              <label>Email<font color="red">*</font></label>  
83:              <input class="form-control" id="email" value="" ng-model="email"/>  
84:            </div>  
85:            <div class="col-xs-12 form-group">  
86:              <label>Title<font color="red">*</font></label>  
87:              <input class="form-control" id="title" value="" ng-model="title"/>  
88:            </div>  
89:            <div class="col-xs-12 form-group">  
90:              <label>Phone</label>  
91:              <input class="form-control phone" id="phone" onchange="formatPhone(this);" ng-model="phone"/>  
92:            </div>  
93:            <div class="btn-group" align="center">  
94:              <button id="btnCreateContact" class="btn btn-primary btn-md center-block" style="margin-left: 216px;">Save</button>  
95:              <a href="#" id="myReset" class="btn btn-primary btn-md center-block" style="margin-left: 15px;">Cancel</a>  
96:            </div>  
97:            <br></br>  
98:            <br></br>  
99:            <div class="modal-footer">  
100:            </div>  
101:           </div>  
102:         <br></br>  
103:       </div>  
104:       <br></br>  
105:      </div>  
106:      <br></br>  
107:      <div >  
108:       <div class="container">  
109:         <div class="panel panel-default">  
110:           <br></br>  
111:           <div class="btn-group" align="center" style="left: 27%;">   
112:             <button id="blocds" data-toggle="modal" data-target="#myModal" class="btn btn-primary btn-md center-block" style="margin-left: 15px;">Modal Using Javascript</button>   
113:             <button id="blocds" data-toggle="modal" data-target="#myModal" class="btn btn-primary btn-md center-block" style="margin-left: 15px;background-color:#DF4720">Modal Using AngularJS</button>   
114:           </div>  
115:           <br></br>  
116:           <br></br>     
117:         </div>  
118:       </div>  
119:      </div>   
120:    </html>   
121:  </apex:page>  

Happy coding!!

Monday, 2 November 2015

FIND MY PARENT SALESFORCE USERS BY ROLE HIERARCHY

Was looking into a blog post of jeff douglas on FIND MY SALESFORCE USERS BY ROLE HIERARCHY, its an awesome utility code for fetching the child users in the hierarchy, so thought of righting a same kind of code to get all the parent users in current user's hierarchy, when I started writing it then I realized it is not that much easily, have to give some time to it.

So here I am, below is the code for fetching the Parent user's id in hierarchy, the method will the return a map of user on the key and the set of Id's of the parent user in the values.


1:public static Map<Id, Set<Id>> getRoleParentSubordinateUsers(Set<Id> userId) {  
2:      Map<Id, Id> roleIds = new Map<Id, Id>();  
3:      Map<Id, Set<Id>> parentRoleIds = new Map<Id, Set<Id>>();  
4:      // get requested user's role  
5:      for(User usr : [select Id, UserRoleId from User where Id IN: userId and UserRoleId != null]) {  
6:        roleIds.put(usr.UserRoleId, usr.Id);  
7:      }  
8:      Map<Id, Set<Id>> parentids = new Map<Id, Set<Id>>();  
9:      for(Id ids : roleIds.keySet()) {  
10:        parentRoleIds.put(ids, getAllParentRoleIds(new Set<ID>{ids}));  
11:      }  
12:      for(Id kys : parentRoleIds.keySet()) {  
13:        for(Id ids : parentRoleIds.get(kys)) {  
14:          if(!parentids.containsKey(ids)) {  
15:            parentids.put(ids, new Set<Id>{kys});    
16:          } else {  
17:            parentids.get(ids).add(kys);  
18:          }  
19:        }  
20:      }  
21:      Map<Id, Set<Id>> mapOfCurrentWithParentUsers = new Map<Id, Set<Id>>();  
22:      // get all of the ids for the users in those roles  
23:      for(User us : [Select Id, Name, Region__c, State__c, UserRole.Name, UserRoleId From User where IsActive = true AND (UserRoleId IN: parentids.keySet() OR UserRoleId IN :roleIds.keySet())]){  
24:        for(Id rids : parentRoleIds.keySet()) {  
25:          if(parentids.containsKey(us.UserRoleId)){  
26:            if(parentids.get(us.UserRoleId).contains(rids)) {  
27:              if(!mapOfCurrentWithParentUsers.containsKey(roleIds.get(rids))) {  
28:                mapOfCurrentWithParentUsers.put(roleIds.get(rids), new Set<Id>{us.id});   
29:              } else {  
30:                mapOfCurrentWithParentUsers.get(roleIds.get(rids)).add(us.Id);  
31:              }  
32:            }  
33:          }  
34:        }  
35:      }  
36:      // return the ids as a set so you can do what you want with them  
37:      return mapOfCurrentWithParentUsers;  
38:    }  
39:    private static Set<Id> getAllParentRoleIds(Set<ID> roleIds) {  
40:      Set<ID> mapOfCurrentWithParentRole = new Set<Id>();  
41:      // get all of the roles underneath the passed roles  
42:      for(UserRole userRole :[select Id, ParentRoleID from UserRole where Id IN :roleIds AND ParentRoleID != null])  
43:        mapOfCurrentWithParentRole.add(userRole.ParentRoleID);  
44:       // go fetch some more rolls!  
45:      if(mapOfCurrentWithParentRole.size() > 0){  
46:        mapOfCurrentWithParentRole.addAll(getAllParentRoleIds(mapOfCurrentWithParentRole));  
47:      }  
48:      return mapOfCurrentWithParentRole;  
49:    }  

Happy Coding!!

Friday, 16 October 2015

#SALESFORCE PLATFORM APP BUILDER CERTIFICATION : SHARING EXPERIENCE

Few days ago, cleared Salesforce Platform App Builder Certification Transition exam, its my 7th Salesforce Certification, I have DEV401 so for me its was 30 minutes exam, having 20 questions, but if you don't have DEV401 then it will be 60 mutliple choice questions for you for 120 minutes, if you have DEV401 and ADMIN 201 then it will be easy for you to clear the exam. Even though I would recommend to study before appearing in the exam. To know more about the exam click here.

Key topic to cover before appearing in the exam :

1. Field Type change affects ( 1 question )
2. Relationships and their properties ( *Master Detail, lookup ) ( 3 questions )
3. Lightning components (*Global Actions, Object Specific Actions) ( 3 questions )
4. Record Types ( 3 questions )
5. External objects ( 1 question )
6. Types of Sandbox ( 1 question )
7. Unmanaged and Managed Packages ( 1 question )
8. Social Accounts, Contacts and Leads ( 1 question )
9. Salesforce1 ( 1 question )
10. Trailhead ( **Salesforce Practice )

I don't remember the questions, but the above topics are more than enough to clear the exam, please do go through the study guide. Passing percentage is 65% that means at least 14 questions should be correct.

Suggestions :

1. Read the questions carefully and the options, many question were TRUE and FALSE and Multiple answer questions.
2. Don't know the right answer, no worries, search for the wrong one, it will clear off your confusion.
3. Easy exam, but don't take it lightly, prepare yourself then go for it.

All the best.

Thursday, 8 October 2015

Reasons Why #Salesforce is the best technology to work with

Many times I felt to share my thoughts for Salesforce and what I feel while working on force.com platform, their are many things in the list and I tried to cover most of them. Might be something got missed because they are allot.


Starting with the best : Connectivity

Salesforce has connected just everything that is working with them or working on Salesforce, salesforce have Partner Programs, in which they help other companies who work on Salesforce, to make it easier for them to do business.

Connects every one with their largest tech-fest DREAMFORCE. This df'15 was also the biggest one. Saleforce helps their customer at everyone point. They work with the society as well, as in this dreamforce they donated 1 Million books to read more click here
There are many things happened at this dreamforce , I got an awesome link to get everything at one place about the dreamforce go to this link, Dreamforce Content Guide


Salesforce hearts : Salesforce MVPs

Salesforce have like 190+ MVP, which are nominated by others, they are the one who utilize there knowledge and experience of salesforce and their work with other to help them learning in Salesforce, this is also a best way
to acknowledge the person who are truly dedicated to their work, few MVPs I know are just awesome and happy to help others, normal example you can have in the communities of Salesofrce they are every where and making Salesforce geeks everyday, they inspire others with their work helping other in learning of the new things of the Salesforce. Salesforce MVP's are truly hero's the way they encourage other, Lauren Jordan is great example of this initiative she encourages the girl power by writing about womens working on the technology by this she inspire others as well (https://saasyforce.wordpress.com/)
And the other one is "Admin Hero" this guy is really a hero, writes about the awesome stories of those guys who have been delicately worked on Salesforce (http://www.adminhero.com/) This blog is by Brent Downey, this is his way of encouragement.


Trailhead : Place to play and learn Salesforce

Trailhead is a place to learn and explore your knowledge with Salesforce platform, it has their Modules and step by step learning tutorial.
This is the year where everybody got to know that how easy is salesforce to learn,
this happened because of the Trailhead, people just started it to learn salesforce and end up becoming a fan of the way they teach you Salesforce, Trailhead is free for everyone, and even kids are learning Salesforce with it. As of now Trailhead has 66 + badges which you will get by completing the modules, the modules of the trailhead covers almost all the part of the Salesforce from Admin to Development to Mobile app to Heroku. Recently they appreciate who all are new to trailheal by sending them an awesome Salesforce t-shirt. If you have still not tried trailhead please go right now and start Trailhead


Salesforce Certifications

Salesforce certifications is a way to show of your expertise in Salesforce, whoever is working on Salesforce have their own madness for the certifications I only know one person who have the maximum no. of Ceritifcations and that is Keir Bowden This is his blog link http://bobbuzzard.blogspot.in/ He is an inspiration, Salesforce have many certifications, each certificate have it definition and defined for a particular expertise. Recently salesforce added few new certifications and Transition exams as well. Companies also looks for the proven expertise which is Salesforce certification, the biggest one is Salesforce Architect (my dream). Become Salesforce Certified Professional and get your dream job.


Salesforce have many more things that will make you crazy to work on Salesforce or get connected with Salesforce, Salesforce in one fastest growing cloud based platform in the world. So come join us.

Thanks

Saturday, 3 October 2015

Mobilize small business at its best with #SalesforceIQ

This dreamforce 2015 many new things were introduced by Salesforce and one of the best and new things from the list is SalesforceIQ, at the same time I thought of using it and listing out its features, SalesforceIQ has utilized it well, it was formerly RelateIQ, Salesforce in July 2014 salesforce acquired the company .

Overview

I basically a mobile app for your emails integrated with your Salesforce org, with some extra feature using which you can utilize your Salesforce Leads, Contacts and Opportunities. You can create tasks as well. New SalesforceIQ for Small Business delivers SMBs a smarter and easier way to supercharge sales. SalesforceIQ is for Small Business, the smart, simple CRM to grow your business.
Here is the pricing, for more details about the pricing go to SalesforceIQ


I am just going to give a step by step, small tutorial of SalesforcIQ.

1. Go to the app store download SalesforceIQ app from there, install it in your phone.


2. Configure your email with SalesforceIQ, you can use gmail or outlook as well and then enter you salesforce Credentials.


4. After all the configuration done, you can access your emails with folders as in gmail you have created.


5. On menu SalesforceIQ have as of now 5 options, its continuously updating, by the time you install it can have more.


6. When you will receive an email you can right from that email you can create a Lead or Contact or Opportunity in Salesforce.


This is how a contact created from the mail is shown, on click on right corner check it will create a contact.


7. Feed in SalesforceIQ

8. Creating Task in SalesforcIQ, Click on the Task option from the navigator, click on right corner + button to add a new task, enter the information then click on check on the right corner to save.


9. In the setting option of the navigator, you can create you signature and sync your phones contacts with SalesforceIQ


for sales reps it will be too helpfull, they can utilize salesforceIQ at it best, thats why it is called as made for small business. I guess this is enough as it will keep on updating as it a salesforce product.

Friday, 18 September 2015

#Salesforce Certified Advanced Administrator Certification ADM 301 - Sharing Experience

Recently like 10 days ago cleared my first "advanced" certification that is Advanced Admin, I have been preparing for Salesforce certifications but time for not supporting me, when time starts giving the support I cleared 5 Salesforce certifications in 80 days and the last on is this one, as I was in a continuous preparation of Admin ADM201, Sales Cloud and Service cloud certification, the preparation helped me allot for clearing ADM-301.


Preparations before appearing in the exam,

After Service cloud certification, I felt this is also not gonna be easy to clear, and trust me ITS NOT.
The exam has Admin, Sales cloud and Service cloud all mix together and raised with one level questions. So you should have Sales and Service experience must before appearing in the exam. Please go through the study guide to check in brief about the exam.


About the exam :
Cost $200 and retake is $100.
60 multiple-choice/multiple-select questions
Passing score: 65%
Time allotted to complete the exam: 90 minutes


Here is a table from the study that will help you what to look into the most for preparation


Its totally clear that these below points have heavy weight-age in the exam
1. Security and Access
2. Sales Cloud Applications
3. Service Cloud applications
4. Reports & Dashboards
5. Process Automation

Please check once before going to the exam the videos I have shared for the preparation of Sales Cloud and Service Cloud, it will surely help you.

My Recommendations :

Advanced Administrator Certification Guide & Tips By Salesforce Ben

From Administrator To Advanced administrator of Salesforce CRM and Force.com Applications

How To Study For The Salesforce Advanced Admin Exam


All the best !!

Sunday, 16 August 2015

Salesforce Certified Service Cloud Consultant Experience

Added one more certification in my list, its one of the known logic based certification, I was nervous when I was giving the certification, you need to have in depth knowledge of Sevice cloud implementation in Salesforce, its all about how a consultant can implement Service cloud at its best in Salesforce.
click here to know more about certification. There are 60 questions on the exam and you need a 68% to pass. Here is the study guide summer'15

I personally recomment these blogs as well

Jeff Douglas Blog (One of my favourites)
How to Study for the Salesforce Service Cloud Consultant Exam

Here is a list of key points to look into before appearing in exam :

1. Knowledge-base technology
2. Email to Case
3. Live Agent
4. Social Contact Centers
5. Milestone & Entitlements
6. Communities
7. Articles
8. Cases (360 degree knowledge)
9. Search Results
10. Service Contract


Other then above you should have Call center knowledge, how to collaborate in between agents and why a consultant should recomment a call center for knowledge and article. Here is a tip sheet that can help.

As I shared a video in Sales Cloud Certification blog, here is the another that will help you in Service Cloud Certification, other then these if you have partner portal access then please do watch Service cloud related videos in it.


You can also go through the flashcard available on cram.com for practice.

If you are done with all these then for sure you are gonna do well in the exam, all the very best.
Thanks

Thursday, 13 August 2015

Get Current Geolocation in Salesforce using Geolocation API

Recently was trying to fetch the current location of mine in salesforce, most of the time people use google api's for it, but just dig in a bit and found something way too easy and way too awesome to use, the best part is you can utilize the javascript code without referring any further libraries.

Here I got the example of using geolocation API, this document is the specification defines an API that provides scripted access to geographical location information associated with the hosting device.

here is the sample code that they shared


So to implement this thing I want to check weather it work on normally on Salesforce or not, So I created a detail button on Account to check the code. I created a geolocation type field on Account object, and created a detail button on it adn added it to the layout.

Here is the detail page button "Check-in" and "Geolocation" field, just click on check-in button you will the current geolocation, to know more about the geolocation field click here


Here is the code of the check-in detail button, please put Behavior as Execute JavaScript of the detail button.

1:  {  
2:    !requireScript("/soap/ajax/26.0/connection.js")  
3:  }  
4:  navigator.geolocation.getCurrentPosition(function(position) {  
5:    var longitude = position.coords.longitude;  
6:    var latitude = position.coords.latitude;  
7:    var account = new sforce.SObject("Account");  
8:    account.id = '{!Account.Id}';  
9:    account.Geolocation__Latitude__s = latitude;  
11:   account.Geolocation__Longitude__s = longitude;  
12:   var result = sforce.connection.update([account]);  
13:   if (result[0].getBoolean("success")) {  
14:        alert('Account updated successfully');  
15:        window.location.reload();  
16:   } else {  
17:       alert('Error : ' + result);  
18:   }  
19: });  

Just try above code, it works like charm. Happy to answer any query.
Hope this will help someone.

Happy coding!!

Tuesday, 11 August 2015

Bootstrap Datepicker for Salesforce1, Google Chrome and Firefox mozilla

Was working on something and got a change for implemtation which should work with Google chrome, Salesforce1 and firefox mozilla as well, with chrome it starts working normally without any modifications, but not in firefox mozilla, I have added comments in the code where I am referring libraries to make datepicker to work in Mozilla.

this is how bootstrap datepicker looks in chrome


This is how it looks in Firefox mozilla


And now in datepicker Salesforce1


Here is the code of the above datepicker

1:  <apex:page showHeader="false" sidebar="false" docType="html-5.0" standardStylesheets="false" applyBodyTag="false" applyHtmlTag="false">  
2:      <html lang="en">  
3:        <head>  
4:          <meta charset="utf-8"></meta>  
5:          <meta name="viewport" content="width=device-width, initial-scale=1"></meta>  
6:          <link rel="stylesheet" href="https://maxcdn.bootstrapcdn.com/bootstrap/3.3.5/css/bootstrap.min.css"></link>  
7:          <!-- script for mozilla without these datepicker will work in chrome but not in mozilla-->  
8:          <script src="https://cdn.jsdelivr.net/webshim/1.14.5/polyfiller.js"></script>  
9:          <script src="https://ajax.googleapis.com/ajax/libs/jquery/2.1.0/jquery.min.js"></script>  
10:          <script type="text/javascript">  
11:            webshims.setOptions('forms-ext', {types: 'date'});  
12:            webshims.polyfill('forms forms-ext');  
13:          </script>  
14:        </head>  
15:        <body>  
16:          <div class="panel-body">  
17:            <div class="form-group" ng-hide="hideformobile">  
18:              <div class="col-xs-12 form-group input-append datepicker">  
19:                <label>Datepicker</label>  
20:                <input type="date" id="mydate" size="16" class="form-control"></input>  
21:              </div>  
22:            </div>  
23:          </div>  
24:        </body>  
25:      </html>   
26:    </apex:page>  

Felt like posting it, as datepicker can take time to implement as it took mine, it works awesome on Salesforce1.

Thanks Happy coding!!